32 KiB

Styling Flask
Learning Objectives
After this lesson, you will be able to:
- Write basic HTML.
- Write basic CSS.
- Style a Flask app.
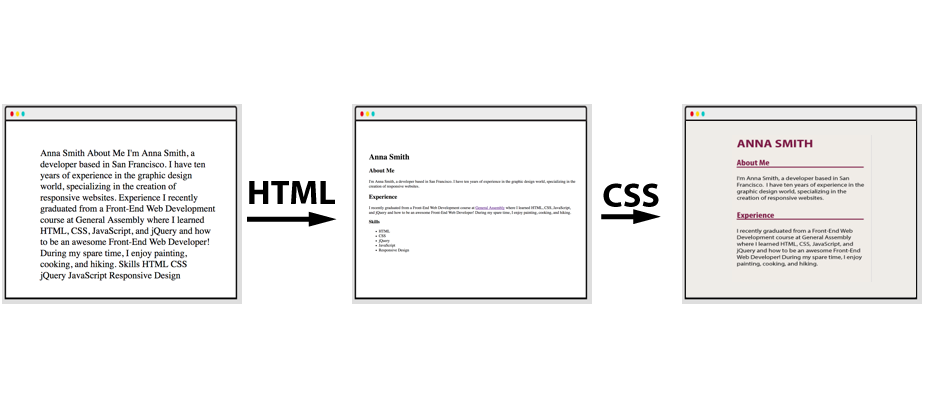
Customizing Our Flask App
Run your my_website.py. How does it look?
Reminder: http://localhost:5000/
How do we add colors? Styles? Formatting?
We need HTML and CSS.
Pro tip: This is front-end web development!
HTML and CSS:
HTML: Content, Structure, and Presentation
- Paragraphs
- Headings
CSS: Style and Design
- Colors
- Fonts
First, HTML
HTML means...
- Hypertext Markup Language
- HTML is not a programming language!
- Adding structure to a webpage. What's a heading? What's a paragraph? What's a list?

HTML Elements
The fundamental building block of HTML is the element.
<p>Here is a paragraph with p tags. The tags won't appear to the user.</p>
-
(Most) elements consist of:
-
An opening tag (
<p>).- Indicates, "Format this content!"
- Defines what TYPE of content it is (e.g., paragraph, header).
-
Content (e.g., text, images, video, or other elements).
- What the user sees.
-
A closing tag (
</p>).- Indicates, "The content has ended."
- Has a
/.
-
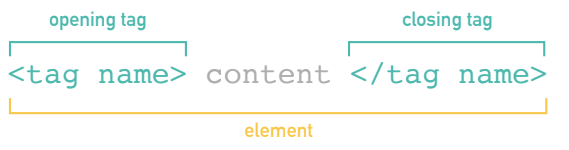
Tags are always in angle brackets.
Types of Tags
Different tags apply different formatting.
-
Paragraphs:
- These will be regular-sized text.

-
Headings:
- These will be larger and bold text.

Paragraph Tags
These are possibly the most common tags — all websites have paragraphs!
- Used to group related chunks of text.
- Browsers will apply default styling.
- The most universal content tag in HTML.
Paragraph Tags
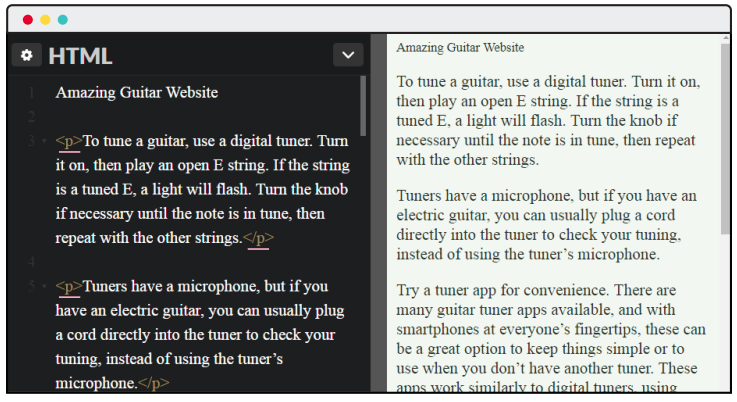
Note: As "Amazing Guitar Website" doesn't have a p tag, it looks different. The browser doesn't yet know how to display it.
We Do: Paragraph Tags
Add <p> and </p> around the paragraphs.
- You might need to "Change View" to see both the input and output.
See the Pen HCC - Anna Smith - List Items by Super Ternary (@SuperTernary) on CodePen.
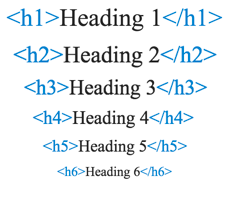
Heading Tags
Heading Tags
- Used to display text as a title/headline of a webpage or webpage section.
- Tags
<h1>through<h6>. <h1>defines the most important title on the page.- Note that we didn't do anything — browsers just know headings are bigger!

Heading Tag Sizing
You Do: Heading Tags
- Put
<p>around the paragraphs. - Put
<h1>aroundAnna Smith. - Put
<h2>aroundAbout Me. - Put
<h3>aroundExperience.
Heading Tags Solution
What About Lists?
There are two types of lists:
- Unordered lists.
- Ordered lists (aka, numbered lists).
The List Tag
-
<ul></ul>defines an unordered list. -
Used together with list item:
<li></li>.
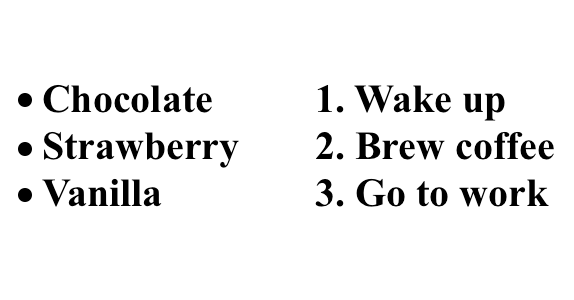
<ul>
  <li>Chocolate</li>
  <li>Strawberry</li>
  <li>Vanilla</li>
</ul>
- Notice the indent — just like Python!
Ordered Lists
-
<ol></ol>defines an ordered list. -
List item is the same:
<li></li>.
<ol>
  <li>Wake up</li>
  <li>Brew coffee</li>
  <li>Go to work</li>
</ol>
You Do: Lists
- Set "Skills" to be an
h3. - Create an unordered list.
- Then create an ordered list!
Lists Solution
Quick Review
We've talked about HTML tags.
- They add structure to a page.
- Browsers automatically size paragraphs and headings appropriately.
- Lists are automatically given bullets or numbers.
All HTML is formed with tags:
We Do: Defining HTML
- Open any webpage.
- Right click.
- Click "View Page Source."
HTML Structure: doctype
<!DOCTYPE html>
-
Short for "document type declaration."
-
ALWAYS the first line of your HTML.
-
Tells the browser we're using HTML5 (the latest version).
Note: The CodePen did this automatically for us. It did a lot!
HTML Structure: <html>
<html> is the tag for HTML content!
- All HTML should be contained inside
<html></html>. - Represents the root of your HTML document.
Within our <html> tags, we have:
<head></head><body></body>
<!DOCTYPE html>
<html>
  <head>
  </head>
  <body>
  </body>
</html>
HTML Structure: <head>
-
<head>: The first tag inside<html></html>.- Adds additional, behind-the-scenes content.
- Is not displayed, but is machine-parsable.
<!DOCTYPE html>
<html>
  <head>
    < BEHIND THE SCENES HERE! >
    <title>< PAGE TITLE > </title>
  	<meta charset="utf-8">
  </head>
  <body>
  </body>
</html>
HTML Structure: <body>
-
<body>: The second tag inside<html></html>.- Follows
<head></head>. - Contains HTML/content that will be displayed to the user.
- All other HTML will be placed here.
- Follows
<!DOCTYPE html>
<html>
  <head>
    <title>Website Title</title>
  	<meta charset="utf-8">
  </head>
  <body>
    <h1>ALL HTML CONTENT GOES HERE!</h1>
    <p>Here's a paragraph with the p tag — this will actually get displayed.</p>
    <h4>Put whatever you want the user to see here!</h4>
  </body>
</html>
We Do: Create an HTML Doc
- Create a directory called
html_practice. - Create a file called
index.html.
Put this content:
<!DOCTYPE html>
<html>
  <head>
    <title>Website Title</title>
  	<meta charset="utf-8">
  </head>
  <body>
    <h1>ALL HTML CONTENT GOES HERE!</h1>
  </body>
</html>
Double click your file to open it in a browser!
You Do: Create a Profile
Using the tags below, create a profile for yourself in your index.html.
Include: Name, About Me, and Hobbies.
Put all your HTML and content in between the <body> and </body> tags.
Common tags you might want to use:
- Paragraph:
<p>paragraph</p> - Heading:
<h1>Welcome!</h1> - Lists:
- Unordered (
<ul>Things I like</ul>) - Ordered (
<ol>1, 2, 3!</ol>) - List items (
<li> </li>)
- Unordered (
- Bonus: Use bold (
<b>bold</b>).
Example Solution
<!DOCTYPE html>
<html>
  <head>
    <title>About Me!</title>
  	<meta charset="utf-8">
  </head>
  <body>
    <h1>Welcome!</h1>
    <p><b>I'm Sonyl and welcome to my profile!</b></p>

    <p>Things I Like:</p>
    <ul>
      <li>Animals</li>
      <li>Food</li>
      <li>Sleep</li>
    </ul>

    <p>My Daily Routine:</p>
    <ol>
      <li>Wake up</li>
      <li>Drink coffee</li>
      <li>Write great code!</li>
      <li>Go to sleep</li>
    </ol>
  </body>
</html>
Quick Recap
An HTML file looks like this:
<!DOCTYPE html>
<html>
  <head>
    <title>Website Title</title>
  	<meta charset="utf-8">
  </head>
  <body>
    < Everything the user sees goes here. >
  </body>
</html>
This is the file your browser gets for any webpage you visit, like Google.com!
Some Tags Need Attributes: Links
-
What about… a hyperlink that we want to click and go to another URL?

-
We need to tell the browser where the hyperlink should go.
<a href="Where does this link go?">Clickable text</a>
<a href="https://google.com">Click here for Google.</a>
We Do: Add a link to Google in your HTML. Reload!
Some Tags Need Attributes: Images
<img>: A picture!- But what picture? We need to tell the browser. The image needs a source:
src.
<img src='https://media.giphy.com/media/sWrDT2OqxJ3Fu/giphy.gif'>
- Images are special — they have no closing tag!
We Do: Add this image in your HTML. Reload!
Quick Recap
Some tags need more information: Where is the link going? What is the image? Give the browser whatever it needs to know.
Don't memorize these!
- There are hundreds of tags.
- You can always:
- Ask a friend.
- Ask me!
- Google "HTML" + what you want to do.
- E.g., "HTML image"
Up next: CSS!
Styling: CSS
Let's switch gears. We have a structured website.
How do we style it?
CSS
CSS means…
- Cascading Style Sheets.
- Styling your HTML (e.g., colors, fonts, text sizes).
CSS tags match HTML tags.
- This rule turns everything with a paragraph tag (
<p>) blue.
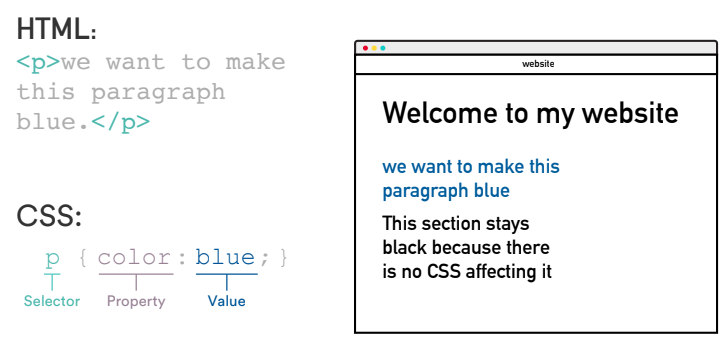
CSS Color Property
You can set text color with color:
p {
  color: red;
}
Color values can be specified using:
- Color keyword (e.g.,
red). - Hex code (e.g.,
#FF0000).- The common way to set colors!
- Color-pickers online give you the code.
We Do: CSS Color
In the CSS window, add:
p {
  color: blue;
}
CSS: Syntax (CTN)
CSS font size:
- Sets the size of the font.
- We'll use pixel values (e.g.,
12px,16px).
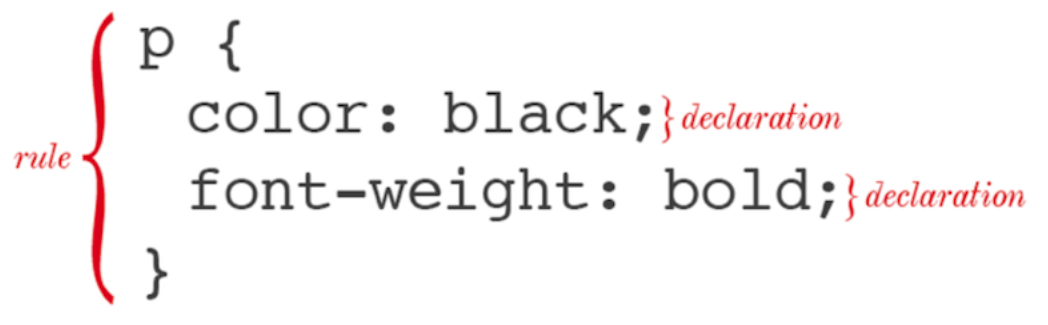
Fun facts:
- One selector can have multiple declarations.
- It's common for each declaration to have its own line.
You Do: CSS
In the CSS window, add:
p {
  color: blue;
  font-size: 12px;
}
Quick Review
We can now style elements. We can style any element with a tag!
p {
  color: blue;
  font-size: 12px;
}
body {
  color: yellow;
}
Adding CSS to HTML
We have CSS. We need to tell the HTML about it! CodePen's been doing this for us.
- Like
<title>, placed within<head>— it's something for the HTML to see, but not the user.
<!DOCTYPE html>
	<html>
	<head>
	  <title>Super Awesome Website</title>
 	  <link rel="stylesheet" type="text/css" href="style.css">
	</head>
	<body>
rel- Specifies the relationship between the current document and the linked document.
type- Specifies the media type of the linked document.
href- Specifies the location of the linked document.
We Do: HTML With CSS
Let's do this.
-
In the directory with your
index.html, createstyles.css. -
In it, put:
p { color: blue; font-size: 12px; } body { background: yellow; } -
Save and reload!
Quick Recap: HTML and CSS
HTML structures the page; CSS styles it. The CSS tags match the HTML tags.
We put CSS in a separate file and link it to the HTML.
p {
  color: blue;
}
<!DOCTYPE html>
	<html>
	<head>
	  <title>Super Awesome Website</title>
 	  <link rel="stylesheet" type="text/css" href="style.css">
	</head>
	<body>
    <p>Here's a paragraph the user will see — it will be blue!</p>
  </body>
</html>
This is a crash course. It's a huge topic! We just need the basics.
Up next: How do we do this with Flask?
We Do: Adding HTML and CSS to Flask
Run your my_website.py — how does it look right now? Probably not the best…
Reminder: http://localhost:5000/
from flask import Flask
app = Flask(__name__)

@app.route('/')
def hello_world():
    return 'Hello, World!'

if __name__ == '__main__':
    app.run(debug=True)
Flask automatically makes the page structure for us — the html, head, body, doctype, etc.
Discussion: Where does that "return" go? Where could we put our HTML?
We Do: Add Some HTML
Flask can have in-line styling and HTML right in the return!
- Inside the quotes. The
returnis what goes inside thebodytag of the HTML.
Try this:
- Add italic tags around "Hello".
- Make the whole string an
h1.
def hello_world():
    # Here,
    # Add
    return '<h1><i>Hello</i>, World!<h1>'
What if we have a LOT of HTML?
We Do: Add a LOT of HTML
Copy this code over:
def hello_world():
    line1 = "<h1><b>Hello</b> World!</h1>"
    line2 = "<p>If music be the food of love, play on!</p>"
    line3 = "<img src='https://media.giphy.com/media/sWrDT2OqxJ3Fu/giphy.gif'>"
    total = line1 + line2 + line3
    return total
Do you think chaining lists is sustainable for a bigger webpage?
Quick Recap:
Flask automatically makes a basic webpage for us. The HTML looks like this:
<!DOCTYPE html>
	<html>
	<head>
	  <title>Super Flask Website</title>
	</head>
	<body>
    < What we return in Flask goes here! >
  </body>
</html>
Flask does that automatically — we just need to write the Python code for the body.
Up next: But what if we have a ton of code?
We Do: External HTML File
Create a folder called templates.
- Flask always looks in a
templatesdirectory for HTML files.
Create a file called index.html with some HTML:
<!doctype html>
<html>
<head>
    <meta charset="utf-8">
    <title>Movie Search</title>
</head>
<body>
    <p>Howdy!</p>
</body>
</html>
We Do: Tell Flask the HTML Exists!
How do we import an HTML file?
render.template.
At the top of your file, add:
from flask import Flask, render_template
In the .py, change your return to return render_template("index.html").
- Save the lines you have! Just change the return.
Try it!
We Do: Expanding the HTML
Now all our lines can go in the HTML:
<body>
    <h1><b>Hello</b> World!</h1>

    <p>If music be the food of love, play on!</p>

    <img src='https://media.giphy.com/media/sWrDT2OqxJ3Fu/giphy.gif'>
</body>
Try it!
Quick Recap:
Flask automatically generates the webpage HTML and puts your HTML in the body tag — whatever you put in your return statement.
If your HTML gets to be too long to put in just a function without being confusing, you can make the HTML file yourself and tell Flask to load that.
We Do: Adding CSS
templates folder:
- Where Flask looks for HTML files.
static folder:
- Where Flask looks for CSS files.
We Do: Adding CSS
Create a static folder with a file, style.css.
Your directory should look like:
project_folder
│
│   │   my_website.py
│   │
│   │
│   └───templates
│   │    └─── index.html
│   │
│   │
│   └───static
│       └───style.css
We Do: Background Color
Add this to style.css:
body{
  background: #FEDCBA;
  font-family: "Times New Roman", serif.
}

h1 {
  color: #012345;
}
What does it do? Reload your page!
What do you think happened?
We Do: Importing the CSS
We have:
- HTML.
- CSS.
Flask knows about:
- The HTML.
What knows about the CSS?
What should know about the CSS? How can we do that?
We Do: Putting CSS in the HTML
CSS styles HTML docs. We know that!
-
As we saw earlier, the HTML doc needs to have the CSS link!
-
In the HTML head, we need to have:
<link rel="stylesheet" href="{{ url_for('static', filename='style.css')}}">
The curly braces {{ }} call Flask!
- "Flask, find
style.cssinstatic."
We Do: Modify your index.html's <head>. Reload your page!
Quick Recap
HTML structures pages. We can make a separate HTML file that Flask calls to load, in a templates folder.
CSS styles pages. We can make a separate CSS file in a static folder.
We have to tell the HTML file about the CSS file.
Flask calls the HTML file, which calls the CSS file.
You Do: Customize Your Page
Modify your HTML and CSS files. Here are some ideas:
- Try changing the colors in your CSS file.
- Use
text-aligntocenterthe content. - Use
text-decorationtounderlinetheh1. - Use other HTML tags! Can you make a hyperlink using
<a href="<url>">Click here </a>? - Can you add a list using
<ul><li></li></ul>?
Example HTML
<!doctype html>
<html>
<head>
    <meta charset="utf-8">
    <title>Movie Search</title>
    <link rel="stylesheet" href="{{ url_for('static', filename='style.css')}}">
</head>
<body>
    <h1><b>Hello</b> World!</h1>

    <p><a href="http://www.shakespeare-online.com/plays/twn_1_1.html">If music be the food of love, play on!</a></p>

    <ul>
      <li>Give me excess of it, that, surfeiting,</li>
      <li>The appetite may sicken, and so die.</li>
      <li>That strain again! it had a dying fall:</li>
      <li>O, it came o'er my ear like the sweet south,</li>
      <li>That breathes upon a bank of violets,</li>
      <li>Stealing and giving odour! Enough; no more:</li>
      <li>'Tis not so sweet now as it was before.</li>
      <li>O spirit of love! how quick and fresh art thou,</li>
      <li>That, notwithstanding thy capacity</li>
      <li>Receiveth as the sea, nought enters there,</li>
      <li>Of what validity and pitch soe'er,</li>
      <li>But falls into abatement and low price,</li>
      <li>Even in a minute: so full of shapes is fancy</li>
      <li>That it alone is high fantastical.</li>
    </ul>

    <img src='https://media.giphy.com/media/sWrDT2OqxJ3Fu/giphy.gif'>
</body>
</html>
Example CSS
body {
  background: #FEDCBA;
  font-family: "Times New Roman", serif.
}

h1 {
  color: #012345;
  text-decoration: underline;
  text-align: center;
}
Summary
-
HTML:
- Structures pages with headings, paragraphs, lists, etc.
-
CSS:
- Styles pages! E.g., colors, bold, underline, font size.
-
Adding HTML and CSS to Flask:
- Use the
templateand thestaticfolders.
- Use the